
You’re not alone if you’ve recently installed a new CPU and noticed that fTPM won’t enable. Many users face this issue, especially when upgrading their processors.
If fTPM is not enabled in your new CPU, go to the BIOS, enable fTPM, and update the firmware. Press ‘Y’ to reset fTPM if no encryption is active or backup BitLocker keys first.
In this guide, we’ll explain why fTPM won’t enable, common causes, and step-by-step solutions to help you resolve the issue and get your system running smoothly again.
Understanding fTPM and Its Role in System Security
fTPM is a firmware-based implementation of the TPM standard, allowing for secure generation and storage of cryptographic keys within the CPU’s trusted execution environment. It plays a crucial role in various security protocols, including:
- BitLocker Drive Encryption: Utilizes TPM to store encryption keys, ensuring data protection securely.
- Secure Boot relies on TPM to verify the integrity of the boot process, preventing unauthorized firmware or software from loading during startup.
- Credential Guard: Uses TPM to protect credentials from advanced persistent threats.
fTPM integrates TPM functionality into the CPU firmware, providing these security features without the need for additional hardware components.
Common Scenarios Leading to fTPM Issues with New CPUs
Several factors can lead to fTPM-related issues when upgrading to a new CPU. Below are some common scenarios that may prevent fTPM from enabling properly.
1. fTPM NV Corruption or Structural Changes
Each CPU has a unique fTPM non-volatile (NV) storage structure. When a new CPU is installed, the system may detect discrepancies in the fTPM NV storage, leading to errors. This can cause security protocols to trigger protective measures, such as prompting the user to reset the fTPM.
2. BitLocker Encryption Conflicts
If BitLocker is enabled, its encryption keys are tied to the TPM module. A CPU change alters the fTPM signature, prompting the system for a BitLocker recovery key. Users unaware of this might face boot issues or data inaccessibility.
3. BIOS or Firmware Incompatibility
An outdated BIOS may not fully support the fTPM implementation of a new CPU. If the motherboard firmware is not updated, fTPM may fail to initialize correctly, leading to system errors or non-functioning security features.
4. Incorrect BIOS Settings
Some motherboards have fTPM disabled by default or require manual activation after installing a new CPU. If fTPM is not configured correctly in the BIOS settings, it may not enable, leading to compatibility issues with Windows security features.
5. Previous fTPM Data Retention
Certain motherboards store fTPM-related information even after a CPU swap. If the old fTPM data conflicts with the new CPU’s fTPM, the system may prevent it from enabling, requiring a manual reset.
6. Secure Boot and TPM Dependency
Secure Boot relies on TPM for system integrity verification. If Secure Boot is enabled but the fTPM does not initialize correctly, the system may prevent booting or display security-related warnings.
7. Hardware-Level Incompatibility
Some older motherboards may not fully support newer CPUs’ fTPM features, leading to functionality issues. This is common in cases where a BIOS update is unavailable for an older motherboard trying to help a next-generation CPU.
Diagnosing the Issue
When facing fTPM-related issues after installing a new CPU, it’s essential to diagnose the problem correctly. Below are key steps to identify the root cause and determine the best action.
1. Check for fTPM Error Messages
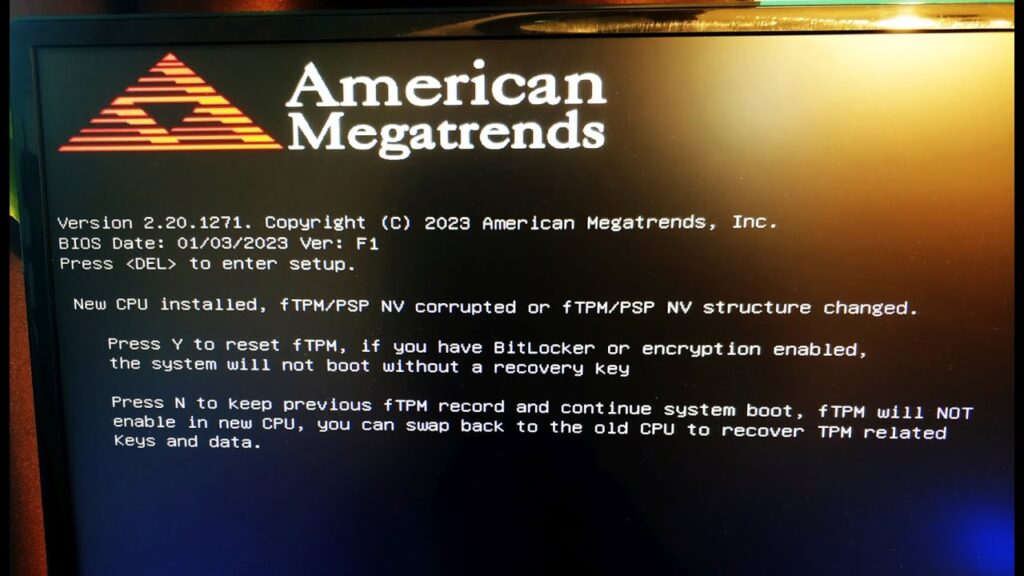
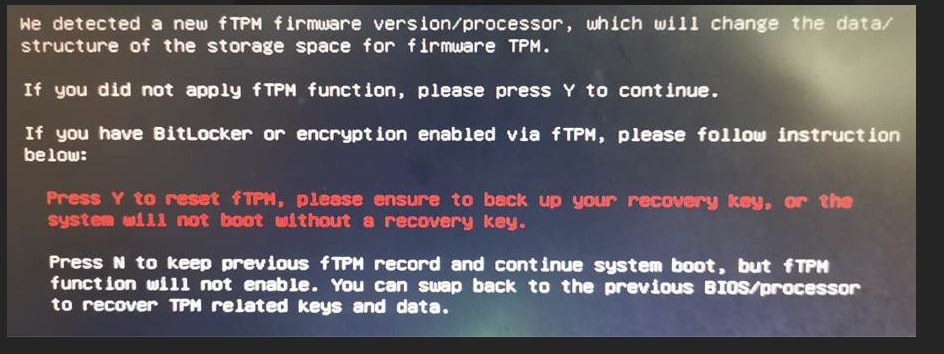
After installing a new CPU, the system may display error messages related to fTPM. Common prompts include:
- “New CPU installed. fTPM NV corrupted or fTPM NV structure changed.”
- “Press Y to reset fTPM. If you enable BitLocker or encryption, the system will not boot without a recovery key.”
- “Press N to keep the previous fTPM record and continue the system boot. fTPM will not be enabled on the new CPU; you can swap back to the old CPU to recover TPM-related keys and data.”
These messages indicate that the system has detected a change in the fTPM configuration, which could potentially affect security features like BitLocker.
2. Verify BitLocker and Encryption Status
Since fTPM plays a critical role in security encryption, check if BitLocker or any other encryption tool is active:
- Open Control Panel > BitLocker Drive Encryption and check if the drive is encrypted.
- If BitLocker is enabled, ensure you have the BitLocker recovery key before making any changes.
- If you don’t have the recovery key, retrieve it from your Microsoft account or backup records before proceeding.
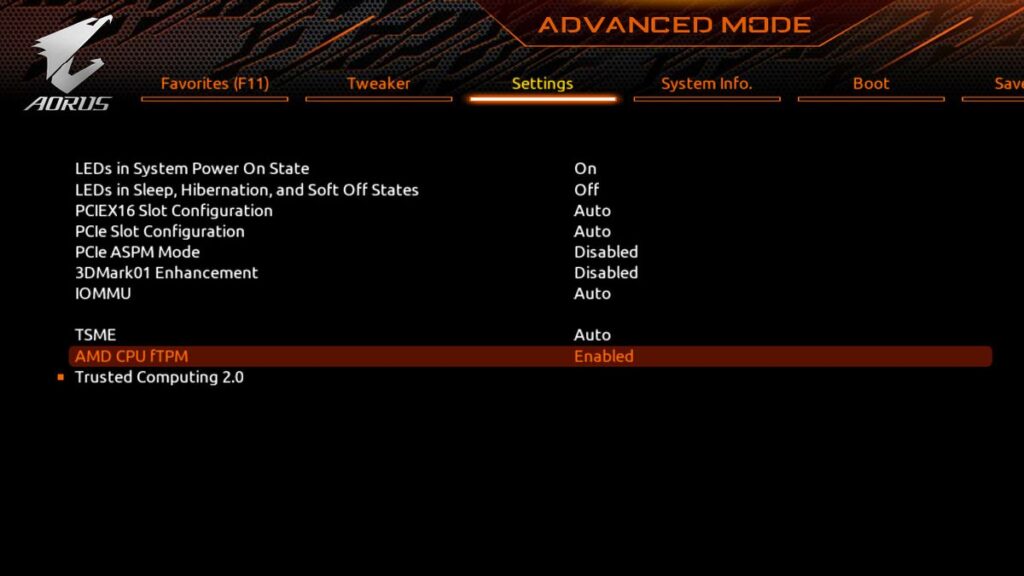
3. Inspect BIOS fTPM Settings
A CPU swap may cause the BIOS to reset or disable fTPM. To verify:
- Enter BIOS by pressing Del, F2, or F12 during startup (varies by motherboard).
- Navigate to Security> TPM Configuration or Advanced > Trusted Computing settings.
- Ensure fTPM (Firmware TPM) or AMD/Intel Platform Trust Technology (PTT) is enabled.
- If fTPM is disabled, enable it, save settings, and reboot.
4. Check BIOS and Firmware Version
An outdated BIOS may lack compatibility with the new CPU’s fTPM implementation. To check:
- Identify the current BIOS version by typing msinfo32 in the Windows search bar and pressing Enter.
- Compare the BIOS version with the latest version on the motherboard manufacturer’s website.
- If an update is available, follow the official update process to install the newest firmware.
5. Review Secure Boot and TPM Dependency
Secure Boot relies on TPM, and a misconfiguration may prevent fTPM from initializing. To check:
- Go to BIOS > Boot Settings and ensure Secure Boot is enabled.
- If Secure Boot prevents changes, try temporarily disabling it, enabling fTPM, and then re-enabling Secure Boot.
6. Monitor System Logs for TPM Errors
Windows Event Viewer can provide additional insights into TPM-related errors:
- Open Event Viewer by typing eventvwr.msc in the Run dialog (Win + R).
- Navigate to Windows Logs > System and look for warnings or errors related to TPM.
- Standard error codes can help pinpoint fTPM activation issues.
Steps to Resolve fTPM Issues After CPU Upgrade
To address fTPM issues after installing a new CPU, follow these steps:
1. Assess BitLocker Status
Determine whether BitLocker or similar encryption services are enabled:
- If BitLocker is Enabled:
- Ensure you have the BitLocker recovery key before proceeding. This key is essential for accessing encrypted data if the TPM is reset.
- Press ‘N’ at the fTPM prompt to retain the existing fTPM data, allowing the system to boot without requiring the recovery key.
- If BitLocker is Disabled:
- Press ‘Y’ at the fTPM prompt to reset the fTPM. Since BitLocker is inactive, resetting the fTPM will not affect system boot or data access.
2. Backup Important Data
Back up critical data before changing the fTPM or BIOS settings to prevent potential data loss.
3. Update BIOS/Firmware
An outdated BIOS can cause compatibility issues with the new CPU’s fTPM.
- Visit the motherboard manufacturer’s website to download the latest BIOS version compatible with your model.
- Follow the manufacturer’s instructions to update the BIOS safely.
4. Disable and Re-enable fTPM in BIOS
Resetting the fTPM settings can resolve initialization issues:
- Enter the BIOS setup during system startup (commonly by pressing keys like ‘Del’ or ‘F2’).
- Navigate to the security settings and locate the fTPM (or TPM) option.
- Disable the fTPM, save changes, and exit the BIOS.
- Re-enter the BIOS, re-enable the fTPM, save changes, and exit.
5. Clear CMOS
Clearing the CMOS resets the BIOS settings to default, which can resolve configuration conflicts:
- Turn off the computer and unplug it from the power source.
- Locate the CMOS battery on the motherboard and remove it for a few minutes.
- Reinsert the battery, plug in the computer, and power it on.
6. Consult Manufacturer Support
If the issue persists after performing the above steps, contact the motherboard or CPU manufacturer’s support for specialized assistance.
Preventive Measures for Future CPU Upgrades
To avoid fTPM-related issues when upgrading to a new CPU, consider the following preventive steps:
- Disable BitLocker Before Upgrading – Suspend or turn off BitLocker encryption before replacing the CPU to prevent boot and recovery key issues.
- Backup the BitLocker Recovery Key – Store a copy of your BitLocker recovery key in a secure location, such as a USB drive, cloud storage, or Microsoft account.
- Update BIOS and Firmware in Advance – Ensure your motherboard’s BIOS is updated to the latest version before installing a new CPU to maintain compatibility with fTPM.
- Check fTPM and Secure Boot Settings – Before upgrading, note the current BIOS settings related to fTPM and Secure Boot to restore them if needed quickly.
- Disable fTPM Before CPU Replacement (If Necessary) – Disabling fTPM before swapping the CPU can prevent TPM NV storage corruption on some motherboards.
fTPM Will Not Enable in New CPU Windows 11
This issue occurs when upgrading your CPU, as Windows 11 relies heavily on TPM. Ensure BIOS and fTPM settings are updated, and check for BitLocker encryption to avoid recovery key prompts during boot.
fTPM Will Not Enable in the New CPU Lenovo
Lenovo systems may experience fTPM issues due to outdated BIOS or incompatible settings. Update the BIOS and enable fTPM in the security settings. Before making changes, ensure BitLocker is disabled, or recovery keys are accessible.
New CPU Installed fTPM NV Corrupted
This error means the system detected changes in fTPM storage due to the new CPU. Press ‘Y’ to reset the fTPM if no encryption is active, or use your recovery key if BitLocker is enabled.
fTPM Will Not Enable in New CPU Gaming
Gaming setups with upgraded CPUs might face fTPM issues, especially on motherboards with outdated firmware. Update the BIOS and enable fTPM in settings to ensure compatibility with gaming features like Secure Boot and Windows 11 requirements.
Press Y to Reset fTPM
Pressing ‘Y’ resets fTPM data but may require a BitLocker recovery key if encryption is enabled. Confirm that no sensitive data depends on fTPM before choosing this option, or press ‘N’ to retain current settings.
Should I Press Y to Reset fTPM?
You should press ‘Y’ if you’re not using encryption or have your recovery key ready. If unsure, press ‘N’ to keep the existing fTPM data and seek further troubleshooting guidance to avoid losing access to encrypted files.
New CPU Installed fTPM/PSP NV Corrupted First Boot
This message signals a conflict between the new CPU and fTPM data. Press ‘Y’ to reset fTPM if no encryption is active, or ensure you have the recovery key for BitLocker before proceeding with this option.
TMPF Error
A TMPF error usually means a problem with the TPM security module. Try updating your BIOS, enabling TPM in BIOS settings, or resetting fTPM. If you use BitLocker, ensure you have your recovery key before making changes.
fTPM on New Processor
When installing a new processor, fTPM might not enable automatically due to BIOS settings or security conflicts. Check BIOS settings, enable fTPM, and update your motherboard’s firmware to ensure smooth functionality, especially if running Windows 11.
Getting “New CPU Installed” Message
This message appears when the system detects a CPU change. It may prompt an fTPM reset, which can impact encrypted data. If you use BitLocker, ensure you have the recovery key before resetting fTPM.
Replaced CPU and Got Something About TPM
When swapping CPUs, the system checks fTPM security. If you see TPM-related errors, enable fTPM in BIOS or update your firmware. If encryption is active, locate your BitLocker recovery key before making changes.
ERROR “New CPU Installed fTPM/PSP Corrupted”
This error means the fTPM storage changed due to the new CPU. If you use encryption, find your recovery key first. Press ‘Y’ to reset fTPM, or press ‘N’ to retain old data if needed.
fTPM Reset Prompt Every Time the System Boots
If you constantly get an fTPM reset prompt, your BIOS settings may not be saving properly. Try updating the BIOS, resetting CMOS, or re-enabling fTPM. Also, check if your motherboard battery needs replacing to retain settings.
“New CPU Installed fTPM/PSP Corrupted” on New Motherboard
A new motherboard and CPU can trigger fTPM errors. Update the BIOS, manually enable fTPM, and check Secure Boot settings. If BitLocker was active on the old setup, ensure you have the recovery key to regain access.
New CPU Installed. fTPM/PSP NV Corrupted Stuck, “Y” Doesn’t Do Anything
If pressing ‘Y’ doesn’t work, reset the BIOS settings or update the firmware. A CMOS reset may also help. If the issue persists, try temporarily reinstalling the old CPU to recover TPM-related data before swapping again.
New CPU Installed, fTPM/PSP NV Corrupted or fTPM/PSP Structure Changed
This message means the system detected a CPU swap and fTPM data mismatch. If encryption is enabled, find your recovery key. If not, pressing ‘Y’ resets fTPM, but you may need to update BIOS for a proper fix.
FAQs
1. Do I Press Y or N for fTPM?
Press ‘Y’ if you don’t need old TPM data. If BitLocker is enabled, press ‘N’ and find your recovery key first.
2. How Do I Enable CPU fTPM?
Go to the BIOS, find fTPM under security settings, enable it, save, and exit. If the option is missing, update the BIOS.
3. What is fTPM When Installing a New CPU?
fTPM is a built-in security feature storing encryption keys. A new CPU may trigger a reset, affecting BitLocker and Secure Boot.
4. Do You Need to Reset fTPM?
Reset fTPM only if you don’t need old security keys. If you use BitLocker, backup your recovery key before resetting it.
5. Is It Safe to Turn on fTPM?
Yes, fTPM is safe and required for Windows 11. It enhances Security but may require extra steps if BitLocker encryption is enabled.
Conclusion
Upgrading a CPU can trigger fTPM issues, but they’re fixable. Ensure BIOS is updated, enable fTPM, and check BitLocker encryption before resetting. If problems persist, consult your motherboard manufacturer. Taking precautions before upgrading prevents TPM-related errors and ensures smooth system functionality.